What Joint Compound to Use With Mesh Tape
Tips for Better Drywall Taping
Updated: Jun. 09, 2020
Simple tricks for fast, flawless drywall finishing
Whether you're finishing a basement, repairing a damaged wall, or hanging drywall in a new house, these taping tips will help you make smoothen, invisible seams, even at inside corners.
You might besides like: TBD
Eliminate as many hard-to-hibernate barrel joints as yous tin
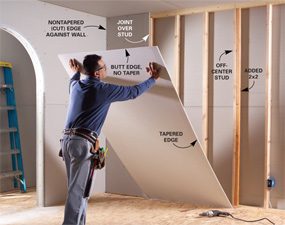
Avoid butt joints
Hang drywall vertically on walls to eliminate barrel joints. Nail 2x2s to studs that don't align with the edges of the sheets.
To hide "butt joints" (where two not-tapered ends of drywall meet), yous take to build upwardly a hump of articulation compound that's very thin and wide. This is time consuming and difficult to practice well. Then if you're a novice drywall finisher, avoiding butt joints is smart.
The all-time fashion to avoid butt joints is to use sheets of drywall that are long enough to cover entire walls and ceilings. As a result, you'll have simply tapered joints to finish. Drywall sheets are unremarkably available in eight- and 12-ft. lengths, and specialty suppliers carry 14-ft. sheets.
If your ceiling is longer than fourteen ft., y'all can't avoid butt joints. Only yous can avoid butt joints on a wall that exceeds 14 ft. Simply hang the sheets vertically rather than horizontally. That way, you'll accept several tapered joints to cover, but no butt joints. Hanging drywall vertically is slower than hanging it horizontally considering you have to make sure the tapered edges fall at the centers of studs. Cut the first sail to width so the tapered edge lands on the heart of a stud. Later on that, the edges of each canvass should fall perfectly on studs. If yous run into misplaced studs, nail 2x2s to them. If you have ix-ft. ceilings, call a drywall supplier to observe 10-ft.-long sheets.
Use mesh tape, non newspaper
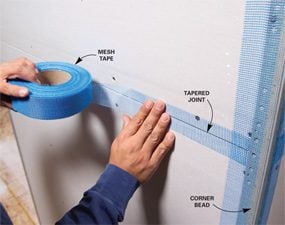
Mesh tape
Employ adhesive-backed mesh tape to avoid fussing with paper tape while you lot spread joint chemical compound.
Pros use paper record to strengthen joints. But in less-skilled easily, paper record can ripple, sideslip out of place or trap air bubbles. If you push too difficult as you embed paper tape, you'll clasp out all the joint compound behind it and the record will pare off afterwards. Adhesive-backed mesh record eliminates all those glitches. But stick it in place and information technology stays put, leaving y'all free to concentrate on spreading a smooth coat of mud. And since it doesn't require an underlying layer of compound, mesh allows for a thinner buildup over butt joints and repairs. Yous can utilise mesh anywhere except inside corners.
But mesh record has i weakness (literally): It'due south not every bit strong every bit newspaper. To compensate, you have to cover it with setting-blazon joint chemical compound, which is stronger than premixed chemical compound (encounter tip below). Apply mesh tape no more a few hours earlier y'all're set up to cover it. Left uncovered, it will eventually autumn off.
Make full joints faster with setting-blazon compound

Deep joints go setting-blazon compound
Mix setting chemical compound with water for deep filling around corner bead, tapered joints and gaps in drywall.

Setting compound
Setting compound is sold as a dry powder, so mixed with h2o to a smoothen, stiff consistency
Mixing upward setting compound is a messy nuisance, but it's worth it. Setting chemical compound has three central advantages over premixed versions: Information technology allows yous to use mesh tape, it hardens fast and it shrinks much less. Quick hardening and low shrinkage brand setting compound perfect for deep filling. A thick layer of premixed compound takes days to dry and shrinks. You'll need several coats to fill the low, and the more layers y'all add, the harder it is to get smooth results.
For pocket-sized repair jobs, you can mix setting compound with a paint paddle. For larger jobs, utilise a corded drill with a 12-in. long mixer attachment. Don't buy a 24-in. mixer unless you have a powerful 1/ii-in. drill. The central to a smooth, clamper-costless mix is to let it correspond about v minutes after the initial mixing. That lets the chunks absorb water before final mixing. Setting compounds have different hardening times, ranging from 5 to 210 minutes. The 45- or 90-minute versions are all-time for nearly jobs. Exist sure to cull a "lightweight" setting chemical compound. Other versions become so hard that sanding abroad mistakes is nearly impossible. Fifty-fifty the lightweight versions are harder to sand than premixed compound, and then it's all-time to use setting compound for the first coat and premixed compound for afterward coats. Be sure to clean tools before the setting compound hardens.
Glaze inside corners faster and smoother with a corner knife

Drywall Corner Tool: Corner pocketknife
Smooth both sides of inside corners at once with an within corner knife. Scrape off the ridges with a taping knife.
It takes a steady manus to embed tape in inside corners with a standard drywall knife. One little slip of the knife and you'll gouge one side while you're smoothing the other. An inside corner pocketknife non only eliminates that problem but does the job faster. Outside corner knives are also available, but we don't recommend them, since corner bead makes smoothing outside corners virtually foolproof.
Apply compound and identify the tape equally usual. Then load some mud onto the corner knife to lubricate the knife and leave a thin coat of compound over the paper. Start at the top of the corner and drag the knife down to about 16 in. from the floor. And then start at the floor and elevate upward. Ease off when you attain the area that'due south already smoothen. You may have to repeat this process 2 or three times to fully embed the tape and create a polish, direct corner. A corner pocketknife doesn't ensure straight corners, so reinforced corner tape is a good thought. Employ a corner pocketknife for the kickoff glaze only; after that, glaze 1 side at a fourth dimension, allowing one side to harden earlier y'all glaze the other.
Dunk newspaper record to avert drywall record bubbling and bulges

Moisten paper record
Tear paper tape to length and wet it. Pull the tape between your fingers to squeegee off the backlog water.
Paper tape can ripple, slip, bulge and bubble. Only you tin minimize these problems by dropping information technology into a bucket of water. Moisture paper tape is more than pliable than dry tape, so it traps fewer air bubbles behind it. Water also makes the newspaper slick, and then your pocketknife slides over the record without creating ripples or creases. Wetting doesn't eliminate the squeeze-out problem, then y'all still have to be careful to go out a thin layer of mud between the tape and the drywall. Don't let the tape soak—that will soften the paper and brand information technology more than susceptible to scuffs and tears.
Continue corners direct with reinforced tape
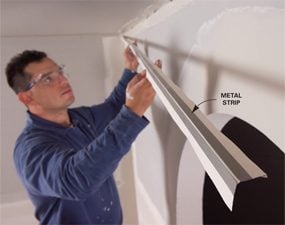
Reinforced corner tape
Embed reinforced tape at inside corners to provide a direct guide for your pocketknife. Exist careful not to kink the metallic strips.
Inside corners are tough to keep corking and directly. Unless you lot accept a very steady hand, your knife tin wander as you lot embed the record. And if you create a wavy corner with the starting time glaze of mud, creating a directly corner with subsequent coats is almost incommunicable.
The solution is to use tape that's backed with metal or plastic strips (available in100 ft. rolls at home centers). This tape is especially helpful on odd-angled corners, which are very hard to go along directly. Information technology's however possible to create a wavy corner if you lot push too hard, so apply light, even pressure every bit you smoothen the joint compound. The strips reduce ripples and bubbles too, and then in that location's no need to wet the tape. Don't overlap the tape where within corners encounter the ceiling. Instead, cut the record short to avoid a triple-thick buildup of tape.
Flatten bumps and bulges between coats for less sanding later

Scrape loftier spots
Shave off high spots in setting-type chemical compound before it hardens. Let standard joint compound to dry out completely before you scrape and sand.
Anybody hates the dust deject raised by sanding drywall. And the all-time way to minimize sanding later is to knock downwards high spots between coats. Left lonely, these high spots will grow higher and wider (and harder to fix) with each coat. Don't worry well-nigh low spots; subsequent coats will make full them.
If you used setting-type compound, inspect the joints earlier the compound has hardened completely. Run a 12-in.-broad knife over every joint. The blade volition scrape off small ridges and nubs. More important, it volition human activity as a straightedge, revealing larger bumps and bulges. When the chemical compound is about the consistency of a bar of soap, yous can easily shave down bulges without gouging. Y'all can sand and scrape setting compound after it's completely difficult, but that'southward more work.
With standard joint compound, nevertheless, information technology's all-time to let each coat dry completely before inspecting, scraping and sanding. The surface of partially dry standard compound may be firm while the underlying fabric remains soft and easy to gouge.
Create a shine surface with a knockdown pocketknife

Knockdown knife
Smoothen out ridges with a knockdown knife. Printing lightly as yous drag the knife over joint compound.
Feathering out a butt joint or skim-coating a whole wall is difficult considering your pocketknife leaves ridges on the broad surface—and touching them up often creates fifty-fifty more ridges. The solution is a "knockdown" knife. With its soft rubber blade, this duster-like tool floats over the surface, flattening ridges without creating new ones.
A knockdown knife won't scrape down big bulges or make full wide depressions, so make the surface as apartment as you can with a 12- or 14-in. metallic pocketknife starting time. And then elevate the knockdown knife gently over the surface in one continuous pass. Utilise light, even pressure and don't terminate or hesitate. On a butt articulation, you'll have to make 2 or three passes to smooth the whole surface. You can brand more passes if necessary, only stop before the chemical compound starts to harden. Although the rubber blade is soft, it can yet make a mess of partially hardened compound. Knockdown knives are available in 18- and 22-in. widths at drywall suppliers and some home centers and hardware stores. A 22-in. version is best for butt joints. To order one online, search for "knockdown knife."
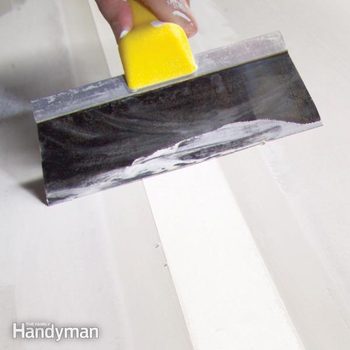
For smooth walls faster, finish with topping compound
Any blazon of joint compound can hold tiny air or h2o bubbling that leave pockmarks on the surface. Simply you'll get fewer pockmarks with "topping" compound. Topping compound looks but like other versions of premixed joint compound, just it has a creamier texture. That smooth consistency makes it easier to feather out and creates a glossy surface with very few pockmarks. It also shrinks less as it dries. With all these advantages, topping compound helps you get to the final sanding stage with fewer coats and fewer fixes between coats. And when the fourth dimension comes, you'll find that topping compound is the easiest compound to sand. Topping compound has poor bonding strength, so don't utilize it for the first coat.
Go along crumbs out of your mud to prevent scars

Keep chemical compound moist
Forestall crumbs of dry compound from forming in the saucepan. Wipe the within of the bucket clean and cover the leftover compound with water.
You lot tin can't create a smooth surface using articulation compound that has crumbs of hardened compound in it. One tiny chunk clinging to your knife volition leave a scar across the whole joint. Cleanliness is the key to keeping your mud gratuitous of chunks. Scrape downwardly the insides of the bucket every time you scoop out mud. So wipe the sides clean with a moisture rag. At the cease of the 24-hour interval, embrace the chemical compound with a thin layer of water. The water will remain on height of the chemical compound, then you can pour it off earlier you use the remaining mud.
Never dump leftover compound from your mud pan back into the bucket; just throw it away. To continue the pan and tools make clean between uses, scour them with an abrasive sponge or immerse them in water. Setting-type compound volition continue to harden even under water, and so wash tools as soon every bit you're washed. Never send large amounts of setting compound downward the drain—information technology can plug pipes.
Required Tools for this Project
Take the necessary tools for this DIY project lined up earlier you get-go—you'll salvage fourth dimension and frustration.
You'll as well need an inside corner trowel and a paddle mixer
Required Materials for this Project
Avoid last-minute shopping trips by having all your materials ready ahead of time. Here'southward a list.
Originally Published: October 17, 2019
Source: https://www.familyhandyman.com/project/tips-for-better-drywall-taping/#:~:text=You%20can%20use%20mesh%20anywhere,compound%20(see%20tip%20below).
0 Response to "What Joint Compound to Use With Mesh Tape"
Post a Comment